

DIY: How to Make Polymer Clay Statement Earrings
This page may contain affiliate links. As an Amazon and Rewardstyle affiliate, we may earn a small commission for any purchases made through these links. Click here for the disclosure statement.
A few years ago, I became obsessed with polymer clay earrings when they started popping up in my local boutiques and markets. I loved the bold, colorful statement they added to any outfit, and after buying a few pairs, I decided that I could probably figure out how to make these for myself.

What I didn’t know at the time, was that a year later, I would be running a small business selling these polymer clay earrings all over North America. (Follow @honeybabystudio on Instagram for more!)
Making polymer clay earrings is easy, but taking them to the next level so that they look less “DIY” and more “Wait, you made this?” can be difficult. Throughout my journey, I’ve made a lot of bad earrings and have wasted a lot of clay in the process. There have been many times that I’ve thought, “If someone had told me that, I would have saved so much time.”
So let me be that person for you. Without further ado, this is an everything-you-could-possibly-need-to-know guide to making your own polymer clay earrings.
Let’s get to it.
Supplies You Need To Make Polymer Earrings
Polymer Clay (We recommend: Sculpey Souffle or Sculpey Premo)
Clay Machine (optional)
Clay
Before you dash off to your local craft store to grab the first block of clay you can find, let’s pause. The type of polymer clay you use is one of the most important elements to creating refined, durable earrings. Certain types of polymer clay can be too dry, too flimsy, or break too easily when baked.
The best types of polymer clay for polymer clay earrings are Sculpey Souffle and Sculpey Premo. (Cernit is also a well-loved brand by jewelry makers, although I haven’t used it.)
These brands carry a variety of colors, and can be mixed and blended to create custom colors as well.

Rollers: Hand-roller vs. Machine
In order to get your clay thin enough to cut into earring shapes, you’ll need to roll it out. This can be done using either a glass rolling pin, or a clay machine (similar to a pasta roller).
When I first began, I used a glass rolling pin that I found at my local craft store. Glass rolling pins are fairly cheap and small enough to store easily. It’s the perfect choice if you are making clay earrings as a craft or a hobby, and don’t need the finest equipment.
However, I did run into certain issues when using the rolling pin for my earring business. It can be difficult to roll the clay to the same thickness throughout, and can cause air bubbles to become trapped in the clay, which can ruin the final look of your earrings.
When I finally made the switch to a clay rolling machine, I was amazed at how much faster the process was. Clay machines are also great for easily mixing colors, and conditioning the clay so that it is soft enough to handle.
The LC Machine by Lucy Clay is the cadillac of clay machines, but if you don’t feel like spending hundreds of dollars on a clay machine, there are many cheaper options on Amazon, as well.

Clay Cutters
Clay cutters are the easiest way to get those cute but bold statement earring shapes. Although you can cut the clay freehand with an X-Acto knife, using clay cutters will save you a lot of time (take it from me). You can find clay cutters at your local craft store and from individual sellers on Etsy.
Drill
You can use a hand or power drill to drill holes into your baked earrings. While some creators swear by the efficiency of power drills, I have always used a simple hand drill and feel that it is a gentler option.

Dremel for Sanding & Polishing
Before you balk at the price of a Dremel, remember that it is not crucial for earring making. However, using a Dremel to sand the edges of my polymer clay pieces took my earrings to the next level and gave them the soft, perfectly smooth edges I was dreaming of.

Other supplies
Jump rings: These will connect the drilled pieces of polymer clay to one another.
Earring posts and backs: Earring posts can be glued to the back of your jewelry as the last step.
Glue: Finding a strong glue is important if you don’t want your earring posts to fall off (as they are prone to do). My favorite glue for this is E6000 industrial glue, which you can find at your local craft store or hardware store.
How to Make Polymer Clay Earrings

Step one: Mixing and conditioning
The first step to creating beautiful statement earrings is to find or create a color you love. You can use clay straight out of the package, or mix a custom color. Mixing clay is almost exactly like mixing paint. However, there have been many times when I have tried to mix a color only to end up with a muddy brown color — and a lot of wasted clay. In order to use your clay as effectively as possible, I recommend purchasing color mixing recipes from creators on Etsy, which will tell you exactly how much of each clay you need to create your desired color.
The next step is to condition your clay. Conditioning your clay simply means making it soft enough to work with. It can be done by rolling your clay in your hands, or passing it through the clay rolling machine, folding, and repeating until soft.
Step two: Rolling the clay
Once your clay is mixed to the desired color and conditioned, it’s time to roll. First, thoroughly clean the surface you will be using. I like to use a piece of scrap clay to clean my surface, so that it picks up any lint or dust.
I roll my clay directly on my kitchen counter top, but you may need to find the right surface for you. If you find that your clay is sticking to whatever surface you roll it on, try taping down a sheet of parchment paper, and rolling it there.
Using your glass rolling pin or clay machine, roll the polymer clay until it is at the desired thickness.
Tip: A good rule of thumb for polymer clay earrings is to have the clay approximately two millimetres thick. Be sure to check your clay for any air bubbles or lint, as these will affect the look of your final product.
Step three: Cutting
Now for the fun part: cutting out the shapes! Using your shape cutters, cut each shape and carefully place it on a baking sheet lined with parchment paper. The pieces will not grow or change shape while baking, so you can put them as close to each other as you need (but not touching).
Have fun, be creative, and try to create new designs for your polymer clay jewelry!

Step four: Baking
Once you have your polymer clay pieces arranged on a parchment paper-covered baking sheet, they’re ready to go in the oven. Baking your polymer clay earrings at the correct temperature for the correct amount of time is crucial to the success of your earrings, and one of the most difficult things for new clay creators to figure out.
The longer you bake your clay, the more flexible the pieces will be. However, it is possible to burn your clay if the temperature is too high. For this reason, I recommend baking your polymer clay jewelry at 270 degrees for 40 minutes.
When your pieces are finished, gently remove them from the baking sheet and place them on the countertop to let them cool. (Careful — they’ll be hot!) Once they have fully cooled, test their flexibility by gently bending the piece. A well-made piece of polymer clay jewelry should bend generously, rather than breaking immediately.
Step five: Sanding
As mentioned before, this step is optional, although it does elevate the look of the final product. Clay cutters can leave the edges of the baked clay rough or slightly sharp, so sanding and polishing the edges leaves the earrings softer and more refined.
If you choose to do this step, use your Dremel on low speed with the polishing attachment to gently soften the edges of each piece. It’s tedious work, but the finished product will make it worth it.

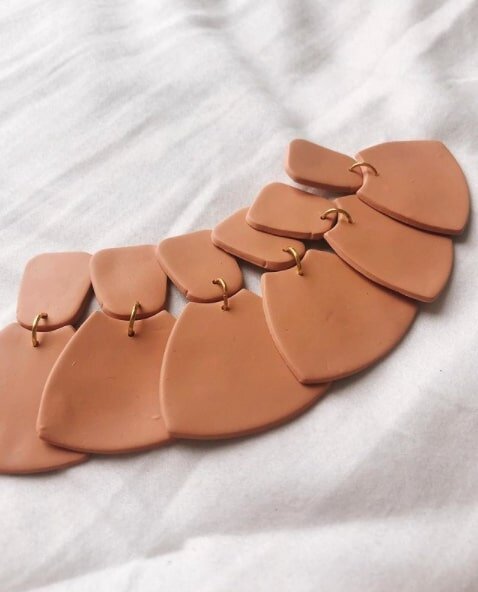
Step six: Assembling
Now that all your pieces are ready, it’s time to assemble your earrings!
Drill small holes in your pieces anywhere you will be attaching jump rings.
Attach the polymer clay pieces to each other with jump rings. You may need small jewelry pliers in order to manage the jump rings.
Glue the earrings posts to the back of the earring. Leave to dry for at least 12 hours before wearing.
There you have it! Once you’ve made your first successful pair of earrings, you’ll be addicted to trying new shapes, patterns, and designs.
Be sure to follow me on Instagram (@katrinaa.martin or @honeybabystudio) and contact me if you’re interested in custom-made polymer clay earrings!